
Images, thumbnails, entropy and PHP
You can also be interested in:
Years ago' I developed a php class to create image thumbnails on the fly, evaluating the interesting part of the image. I wrote about this in my company's blog, now I'd like to share these concepts here, in my poor english.
Why, what?
Generate thumbnails from images is a common task in modern web applications, because there is no reason to serve oversized images, when they are used as 800px wide (or less) images in a template. There is no reason to make a user download the whole image (many KB or MB), if then it is resized through css.
But how to deal with thumbnails?
There are two main approaches used by modern web applications:
- have the backend generate the thumbnail when the user uploads the image
- create a thumbnail on the fly, serve it, and store it in order to use it when requested again
Here I'll talk about the second approach, which is the one used for example by sorl-thumbnail, an awesome django application.
As usual, there are pros and cons with every approach, but in my opinion there are more pros than cons with the second approach. Actually I can think only of one con: it is difficult to tie the generated thumbnail to the model it belongs, so that when the belonging model is deleted, the thumbnail is not. A solution could be to periodically remove the old thumbnails (it is not a problem, since the delete thumb will be created again when requested). Now let's talk about the pros:
- you can create thumbs of every image accessible to the php function imagecreatefromjpeg (or its friends for other extensions)
- there is no limitation in the number of thumbs that can be created from an image. When creating the thumb in the upload process, instead, you have to create in that moment all the thumbs you think you'll use in your application
- if you decide that the image X in the sidebar now should be bigger, you won't need to re-upload all the images in order to get the correctly sized thumbs, because simply they will be generated on the fly with the new desired size
So, how to do this in php?
The end user perspective
I find useful in my work, to design things thinking about how the end user will use them. So I want a class that can be used this way:
$img = new Image($path);
$thumb = $img->thumb(100, 100);
$path = $thumb->getPath();
I need a thumb method, which have to generate a thumb, but only if it was not previously created. How?
The key
Fortunately, it is not a complex thing. We need to generate on the fly a thumbnail of an image A, with the properties W (width) and H (height), save it to the filesystem, record to the db the thumb path, and find a way to compare the generated thumb with the others, in order to understand when a new thumb must be created, or a prev created thumb can be served.
In order to this we create a db table with columns key, path, width and height. The key should be unique and generated starting from the thumb properties, so that when a new thumb is requested, a check can be made in order to understand if the requested thumb was previously generated. So, for example, we can generate the key this way:
 /**
  * @brief Generates a unique key for an image manipulation
  * @param string $abspath image absolute path
  * @param int $width final with
  * @param int $height final hieght
  * @params array $options options
  * @return string unique key
  */
  private function toKey($abspath, $width, $height, $options) {
    $json_obj = array(
      'path' => $abspath,
      'time' => filemtime($abspath),
      'width' => $width,
      'height' => $height,
      'options' => $options
    );
    $key = md5(json_encode($json_obj));
    return $key;
  }
With this code we get a unique key (ignoring the md5 algorithm collisions) for every set of path, last edit date, final size and options which at the moment are unimplemented.
How to use this key?
The thumb method
Here it is:
/**
 * @brief Generates a thumb with the given dimensions
 * @description The thumbnails are generated on the fly and cached in a db.
 * If an already created thumb is requested, then it is served, otherwise a new thumb is created.
 * @param int|null $width thumb width
 * @param int|null $height thumb height
 * @param array $options options
 * associative array of options:
 * - 'allow_enlarge': default false. Allows the image enlargement to satisfy the requested size.
 * @return Image new image object, wrapper of the generated thumb
 */
 public function thumb($width, $height, $options = array()) {
   $key = $this->toKey($this->_abspath, $width, $height, $options);
   if(!$thumb = $this->getThumbFromKey($key)) {
     $thumb = $this->makeThumb($key, $width, $height, $options);
   }
    return $thumb;
 }
As you can see, it's quite straightforward. I'll not explain the method which gets the thumb from a key (getThumbFromKey), nor how to store in the db the key, width and height, it's very simple.
The makeThumb method is the one which actually creates the thumbnail, saves it to the filesystem, and stores its data in the database.
Wait... haven't you talked about entropy?
When creating a thumbnail, you can resize it considering one of its sides and preserving the aspect ratio. But this is bad, your clients most likely love square images! So you need to add a feature more: cropping.
When dealing with the crop functionality, we need to decide some stuff:
- coordinates of the top-left most point where the crop starts
- crop width
- crop height
How to decide which is the best top-left point position?
Well, the first, simple, trivial approach, would be to crop in the center. Very often the subject and the most dynamic part of a picture resides in the center, but not always (lucky us, I would say)!
And here, ladies and gentlemen, the entropy comes on stage. We would like to crop the part of the image which contains the maximum variability, the most interesting part, the most dynamic part. In other words we'd like to crop the part of the image where the entropy is maximized.
Easy! We just need to find out which subset of px of width W and height H of the original image maximizes the entropy!
Lucky me, many people already faced this problem, and I got the ideas from here. Unfortunately, Tim Reynolds used the ImageMagik php lib, while I want to obtain the same results with the gd lib.
Now I paste here the whole Image class, and then we'll see in detail the lines of code which allow to crop the image in the portion which maximizes the entropy.
The interesting part starts at the line 355. The first filtering operations have the function of flattening all the parts of the image which already tend to be flat:
- the original image is cloned (we don't want to break it)
- we apply the edge detect filter, which emphasizes the parts of the image where the brightness changes a lot (we are searching for the maximum entropy!)
- we transform the color space in a gray scale
- we set to black every point which is almost black (this function exists in ImageMagik, while I had to reproduce it for the gd, see the
blackThresholdImagefunction) - we apply the blur filter to flatten even more the flat parts
At this point the image is ready to be investigated in order to search the most interesting part!
Let's look at the line 412. The slice method is the one which allows to calculate (in the 2 directions) the portions with maximized entropy. It can appear a bit complex, but it isn't, I sware!
Let's consider the horizontal direction. We cut the image in narrow slices (how narrow it's up to you, and in general you can make it depend on the image size), then we calculate the entropy of every slice. This way we obtain N slices, each one with its own entropy.
We know that cropping with a width W, we can include only M slices, so we choose M in order to maximize the entropy (which is the sum of the entropy of the M slices). Doing the same thing in the vertical direction, we can calculate the top-left point that we were looking for!
There is only one thing left: how can we calculate the entropy of a single slice? Let's go to the line 480.
First of all we need to derive the image histogram. ImageMagik exposes a method which does exactly this, but we're using the gd lib, so let's write our custom method. In a few words, the image histogram should return the list of colours in the image, with the relative occurrences. So we loop over every px of the image, we read its colour and we store an array of frequencies. Obviously the flatter the frequencies distribution is, the maximum entropy we have (many colours appearing more or less the same number of times). On the contrary, a distribution with a big peak, means less entropy, because there is one predominant colour (the blue color for a sky?)
Once we calculated the image histogram, we calculate the entropy with the method defined at the line 516. We iterates over all the colours and we increment the entropy of a quantity equal to the product of P and the base 2 logarithm of P, where P is the colour probability. Such probability, it's simply given by the colour frequency divided by the image area (the number of px with the colour X divided by the total number of pixels).
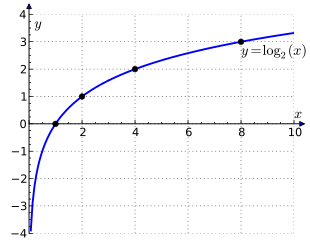
The logarithmic function acts as an amplifier for the flatten distributions (with many low probabilities). Indeed if the probability is low (and obviously minor than 1), the logarithm module grows very quickly while the probability approaches 0, giving more importance to its contribution. Here it is the logarithm graph:
We didi it!
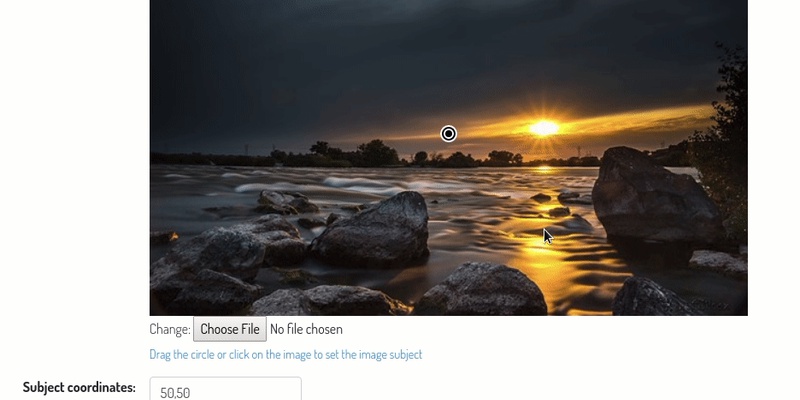
And now.... let's see the result: I took the same picture used in the article I linked previously, and I generated a thumbnail 100x100.

Can you see it? The thumb represents exactly the most dynamic and interesting part of the image!
Hasta la proxima.
If you really, really enjoy this entry...
Writing articles (in a foreign language) and write and test code requires a lot of time, so if you find something really useful for you, you can support my work and my blog. Since I'm Italian, and a good drinker, you can
Thank you!
Your Smartwatch Loves Tasker!

Your Smartwatch Loves Tasker!
Featured

Django admin and bootstrap 5
Bootstrap 5 has come, currently in beta release, and seems already very stable.
So the question is: are you looking for ...
About code optimization, learn from exercises
Let's see an example of exercise you can face during a job interview, and let's use it to understand some ...

Notes on the Pearson correlation coefficient
The Pearson correlation coefficient is a measure of the linear correlation between two variables X and Y. It has a ...
Archive
- 2021
- 2020
- 2019
- 2018
- 2017
- Nov
- Oct
- Aug
- Jun
- Mar
- Feb
- 2016
- Oct
- Jun
- May
- Apr
- Mar
- Feb
- Jan
- 2015
- Nov
- Oct
- Aug
- Apr
- Mar
- Feb
- Jan
- 2014
- Sep
- Jul
- May
- Apr
- Mar
- Feb
- Jan
- 2013
- Nov
- Oct
- Sep
- Aug
- Jul
- Jun
- May
- Apr
- Mar
- Feb
- Jan
- 2012
- Dec
- Nov
- Oct
- Aug
- Jul
- Jun
- May
- Apr
- Jan
- 2011
- Dec
- Nov
- Oct
- Sep
- Aug
- Jul
- Jun
- May