
Deploy django applications with nginx, uwsgi, virtualenv, south, git and fabric, part 2
You can also be interested in:


Ok, this is the second part of the django deploy environment, you may find the first part here.
In the prevoius post we have seen how to install nginx webserver an some system packages, both in locale and remote, now it's time to start our developement in locale.
Let's create a new virtualenv
The use of virtualenv is incredibly comfortable and lets you keep separated environment for different projects. So first of all create a new virtualenv in the place you prefer
	$ mkdir ~/virtualenv


	$ cd ~/virtualenv


	$ virtualenv --no-site-packages myproject
Done, now we can activate the virtualenv so that every new python package will be installed in it, so
$ source ~/virtualenv/myproject/bin/activate
MySQL as the database server
Why MySQL? Only because I'm easy with it, I know its syntax, I'm accustomed with it and because I use it at work.
But, since the role of mysql in the whole deploy structure finishes here, you may want to use a different db server, more efficient, lightweight and which uses less system resources
In the first post we installed mysql server in our machine, now it's time to add a python module in our virtualenv to work with it, in order to do this we need another package, so (be sure to have the virtualenv activated)
	# ape-get install libmysqlclient-dev


	$ pip install mysql-python
Now we are ready to use mysql as the django db backend.
Let's install django
It's time to install django in our new virtualenv, so
$ pip install django
Create a django project
To create the project myproject run
	$ mkdir ~/sites


	$ cd ~/sites


	$ django-admin.py startproject myproject
this command will create the typical django structure as you may see here.
Now you can begin coding, create apps (look at the next session for how to use South for table migrations) and so on, let's talk a little about the project folder structure, which in my projects looks like this:
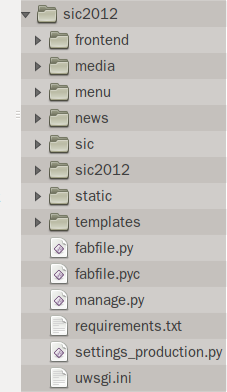
In this image we may see some apps: frontend, menu, news and sic.
The real project folder sic2012, not the container one, which contains the settings.py, urls.py etc...
The static folder where we collect all static files taken from the classical static folders in apps and the media folder which contains user uploaded files.
The templates folder containing the general tamplates (base_site.html etc...). Recently I've moved this one inside the real project folder.
Then we have some files which we will discuss later on: fabfile.py is the file which contains the instruction for fabric in order to automate the deploy, requirements.txt is the file containing all the project dependencies (thanks to pip freeze command), settings_production.py is a copy of the project settings.py but with the parameters changed to fit the production environment, uwsgi.ini is a configuration file for the uwsgi application server container.
Db tables migration using South
Ok, if you are a developer 'de puta madre', probably you follow some perfect roles when creating a web application and you don't need to change your models after having created them, moreover you can still add fields to them and
python manage.py syncdb
does the job, but happens and in my case very it happens very frequently, to have the need to change the data types of some fields, in this case the built-in syncdb commands doesn't work, so let's use South.
First of all let's install South in our virtualenv, be sure to have it activated and then
$ pip install South
To make it work in your project you have to add south to the INSTALLED_APPS in your settings.py and the run a syncdb to create its table used for migrations.
South can do extraordinary things, but used at a very basic level lets you change your models and update the database fields, essentially you will use 2 commands, the first only the first time:
python manage.py schemamigration myapp --initial
to create the first schema, the you can apply it (and create the database tables):
python manage.py migrate myapp
After the first time, if something changes in your models you have to run
python manage.py schemamigration myapp --auto
and once again apply it (in order to update your db tables)
python manage.py migrate myapp
That's all.
Next
Continue reading the part 3, how to setup nginx and uwsgi in locale.
Your Smartwatch Loves Tasker!

Your Smartwatch Loves Tasker!
Featured
Django admin and bootstrap 5
Bootstrap 5 has come, currently in beta release, and seems already very stable.
So the question is: are you looking for ...
About code optimization, learn from exercises
Let's see an example of exercise you can face during a job interview, and let's use it to understand some ...

Notes on the Pearson correlation coefficient
The Pearson correlation coefficient is a measure of the linear correlation between two variables X and Y. It has a ...
Archive
- 2021
- 2020
- 2019
- 2018
- 2017
- Nov
- Oct
- Aug
- Jun
- Mar
- Feb
- 2016
- Oct
- Jun
- May
- Apr
- Mar
- Feb
- Jan
- 2015
- Nov
- Oct
- Aug
- Apr
- Mar
- Feb
- Jan
- 2014
- Sep
- Jul
- May
- Apr
- Mar
- Feb
- Jan
- 2013
- Nov
- Oct
- Sep
- Aug
- Jul
- Jun
- May
- Apr
- Mar
- Feb
- Jan
- 2012
- Dec
- Nov
- Oct
- Aug
- Jul
- Jun
- May
- Apr
- Jan
- 2011
- Dec
- Nov
- Oct
- Sep
- Aug
- Jul
- Jun
- May